


Making the Most of Vakaros Connect
I’m Tyler, head of mobile development here at Vakaros. I work on developing a number of apps, but the one we’re gonna be talking about today, and the one that you’re probably most familiar with, is Vakaros Connect.
What is Connect?
The Vakaros Connect app is where a lot of the magic happens, and helps to transform your Atlas from an instrument strapped to your mast, to a central part of your sailing experience. For the sake of this article I’m going to assume that you’ve already done some of the basic setup with Connect, maybe you’ve even taken your device out for a rip and have checked out your top speed. Today we’re gonna cover some of the more in-depth features that you may have missed.
Download Vakaros Connect for iOS
Download Vakaros Connect for Android
Best Practices
Set up your UI
The Atlas is more than just a passive instrument, it’s actively working with you to provide instant feedback on what’s going on. So it's really important to configure what is getting displayed and when.
You can find the Display Layout builder by first selecting your boat, and then choosing the device you want to configure, and finally tapping on “Display Layout”. From there you’ll be greeted with a facsimile of your Atlas.
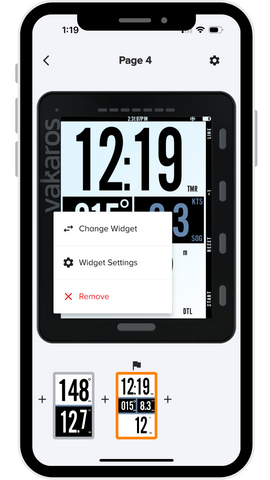
Widgets
The Atlas supports up to 10 different pages, with each page supporting up to 4 widgets. The widgets range from the basics such as heading and timer, to some more advanced ones, such as VMG, time to burn (TTB), and time to line (TTL), as well as data from wind sensors and transducers! You can also change the color of the widget to have a white or black background, here at Vakaros we’re big fans of what we call “black out mode”.
Aside from all the widgets, we also offer a few additional customization options for each page
LEDs
Not only are they good for showing you that your device is turning on, those seven LEDs at the top of your Atlas can show a range of different information, allowing you to get even more feedback without having to use a widget. Each LED configuration comes with a short demo within the app, so be sure to check all of them out!
Buttons
Configure what the buttons do on each page.
Training Modes
Have you ever gone through a tack or a gybe and thought to yourself, “I wonder how much distance I lost in that maneuver”, me neither. But for those of you who do, our Tack/Gybe loss mode is for you! With this enabled you can begin to start perfecting your tacks and gybes.
Home Page & Start Page
Finally, it’s really important to set both your home page and your start page. First, the home page is the page that will first appear when you turn on your device, as well as the one that’ll be switched to when a starting sequence is over. Second, the start page is the page that will be switched to when you press the “start” button and the starting sequence begins.
Adjust dampening
On the device profile page, if you scroll down to the section labeled “Data Channels” and tap on one of the options such as Hdg, GPS, or IMU, you’ll have the ability to change the dampening that’s applied to those values. There is no perfect level of dampening for any one sailor or boat, but generally we find that a good rule of thumb is less dampening for slower boats. But we encourage you to try out the different levels to find what’s best for you.
Orientation
Further down, under “General” you’ll find “Orientation”. This is where you can set the angle that the Atlas is at when your boat is at rest, this will make sure that heading, heel, and trim measurements are all accurate. If you know that value right off hand you can enter it manually, or when your boat is in the water (such as when tied to the dock) and your device is turned on, you can press the “Use Current Roll and Pitch” button. Also, if your device is lying prone, which is common in board sports and some smaller boats, be sure to put it in prone mode for the best experience.
Compass Calibration
It’s important to show proper magnetic respect to your devices, i.e. not setting your device on top of your laptop's speaker, or near some other sort of powerful magnet. But if that does happen, so that when your compass is facing north, but it’s saying south and you start to question if you can trust anything anymore, just take a deep breath and remember “compass calibration”. To calibrate it, just go to the device’s tab, select your device, and press “Compass Calibration”. There will be instructions to walk you through the process. So just find a nice open, outdoors spot and start to do the calibration dance.
Download your Sessions
Once you’re done with sailing for the day and are starting to head back to the dock, be sure to open up Connect (if safe to do so), so that you can start downloading your sailing data! This process will start automatically so you can put your phone away again once Connect has been opened. This will make sure that your session is downloaded and ready to look at by the time you’re back on shore.
But if it’s not safe to do so while sailing back in, the time that you spend derigging can be a perfect time to start downloading as well. Either way, this will make it so you can compare data with your friends over snacks and drinks.
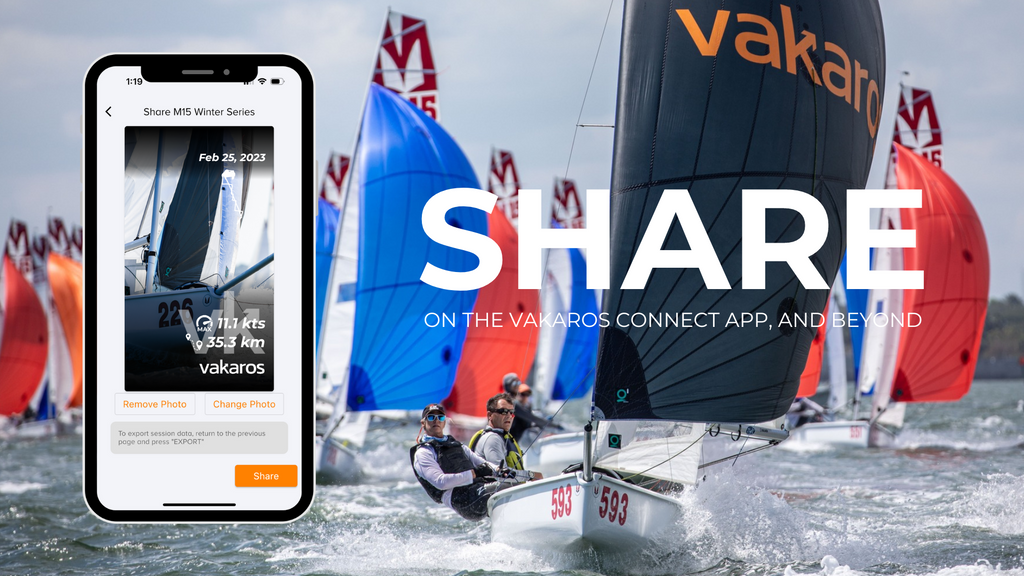
Share your Sessions
Not content with keeping your sailing data confined to the boat park? From the session page, you can hit “Share to Socials” which will take you to a premade graphic, highlighting your track, max speed, and distance covered. You can even personalize it by adding a photo. Don’t forget to tag @vakaros_sailing when you do post it!
I hope this article provides some insight on how to get the most out of Connect. If you have any questions or feature ideas, don’t hesitate to reach out. - Tyler


